Wednesday, December 30, 2009

Horizontal "Ribbed" Scarf

This is a lovely little green scarf that I knit up for my friend for Christmas. The nature of the design shrinks in slightly on itself, but since it is a very simple pattern, it still knit up incredibly quickly and turned out looking really beautiful! I particularly like this pattern because unlike a normal ribbed scarf, which shows off the knit stitch, this scarf's ribs are the purl stitch.

To make this scarf you will need:
  • Approximately 300 yards of medium weight yarn - I used a Red Heart yarn in green
  • US Size 8 knitting needles
Skill Level: Beginner
  • Cast on 25 stitches
  • Row 1: K
  • Row 2: P
  • Row 3: K
  • Repeat these three rows until the scarf is at desired length - mine was approximately 6 ft long. I also chose to add a feminine touch for the future owner by adding some tassels.

Monday, December 28, 2009

Heaven = Chocolate Chip Cookies

These are easily the best chocolate chip cookies I have ever had in my whole. entire. life. ever. Since I want you too to enjoy a bit of heaven, I'll indulge you with the delectable recipe!!

My mom has been brewing up batches of these savory cookies since long before I was born. I have literally heard so many stories about these heavenly cookies from her college friends that I'm starting to wonder if she perhaps added a little something special to her recipe at its inception that gained these cookies such a glorified reputation...

Either way, below lies the recipe of the best chocolate chip cookies. ever.
  • This recipe yields approximately 25-30 cookies.
Time: Quick and delicious
  • Prep: 10 minutes
  • Bake: 15 minutes

Ingredients:
  • 1 1/3 cups of butter (I know that's nearly 3 sticks of butter...just don't think about it)
  • 1 cup granulated sugar
  • 1 cup of dark brown sugar, packed
  • 2 eggs
  • 3 cups of all-purpose flour
  • 1 teaspoon baking soda
  • 1 teaspoon salt
  • 2 cups chopped walnuts*
  • 3 cups semi-sweet chocolate chips
  • 2 teaspoons vanilla extract
* Can be eliminated depending on preference and allergies - Cookies will spread more so make into smaller balls.


  1. Preheat oven to 375 degrees.
  2. Mix butter, eggs, and vanilla until smooth.
  3. Add dark brown sugar and granulated sugar.
  4. Add flour and mix all ingredients thoroughly.
  5. Add chocolate chips and mix (with hands is easiest)
  6. Add Walnuts and mix, again with hands
  7. Place on a greased baking cookie sheet in heaping tablespoons.
  8. Bake for approximately 15-20 minutes or until golden brown.

Saturday, December 26, 2009

Sam Adams' Old Fezziwig Ale


Seeing that it is the most wonderful time of the year, I decided to have a festive brew this week, so I chose Sam Adams' Old Fezziwig Ale.

My Rating: 87

Alcohol Content: 5.6%

This beer is delicious and sweet, and receives a very high B+ from me. It pours a beautiful, almost garnet color and has a relatively thin, finger's width ivory head. This beer is made from several malts, including chocolate and caramel, which can slightly be detected on the palette. It smells wonderful, offering an immediate intrigue of orange, cinnamon, and other spices. Old Fezziwig sips warmly, (it is a winter warmer after all) and is a smooth delightful beer to sit back with on a cold winter night.

I have never seen Old Fezziwig Ale in a six pack - I believe that it is only available in the Sam Adam's Winter Seasonal 12-Pack, which will run you around $15.00. The 12-pack is well worth the money as it features numerous other delicious brews such as the tart Cranberry Lambic and the always classic Boston Lager.

Make Your Own Holiday Bags

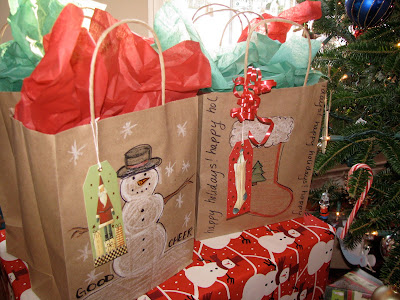
As a relatively thrifty young woman, I am always looking for creative ways to save money. So this year, I decided to make my own bags for gifts on Christmas. I love to draw and color so it was really fun for me to hand craft these bags. It only took me a few minutes to make each, and they really added a nice personal touch to my gifts!

I bought a 12-pack of brown paper bags at target for $4.99 and then also some cute little gift tags. Then I whipped out my handy dandy crayola crayons and made very simple designs on the bags: stocking, snowman, holly, poinsettia, and so forth. The great thing also about making your own gift bags is that you can make them for any occasion or holiday and create something that is personal ad fun.

To add some extra depth to the drawings, I outlined them in sharpie marker so that they would really pop. Then, with sharpie in hand, I also add some jolly "good cheers" and "happy holidays" and such not.

This project was quick and made a nice, personalized and might I add, affordable, way of gift giving!

Beautiful Basketweave Scarf


The Basketweave Stitch is simple and turns out incredibly beautiful. If you're a beginner knitter, this is a perfect project to practice your counting! I made this scarf for my mom and she love love looooved it!

To make this scarf you will need:
  • Two skeins of Impeccable Yarn in Burgundy
  • US size 8 knitting needles
Skill Level: Beginner
  1. Cast on 31 stitches. I like to give a pattern a border, so I left 3 stitches on both sides to do just in the knit stitch, hence the odd number of stitches.
  2. First fives rows - K
  3. Begin 8-row pattern:
  • row 6 - K8, P5, K5, P5, K8
  • row 7 - K3, P5, K5, P5, K5, P5, K3
  • row 8 - K8, P5, K5, P5, K8
  • row 9 - K3, P5, K5, P5, K5, P5, K3
4. Repeat rows 6 - 9 - now the pattern will be 8 rows high.
  • row 13 - K8, P5, K5, P5, K8
  • row 14 - K3, P5, K5, P5, K5, P5 K3
5. Rows 12 and 13 are the same, which means the pattern is flipping so that blocks can be created. I did 8 rows of the stitch because I found that that was the closest to creating a square - Feel free to add more or less rows as you choose!

Friday, December 25, 2009

All I Want fo Christmas is...Sugar Cookies!


With the holidays in hand, I decided to bake and decorate sugar cookies with the girls I nanny. This dough came out PERFECT and created delicious cookies that were just crisp on the outside and still soft on the inside...Yum! I used Royal Icing and Gel Food Coloring for the frosting and we had a wonderful afternoon baking, decorating...and of course...eating!!

Sugar Cookies:
  • 2 3/4 cups all-purpose flour
  • 3/4 teaspoon baking powder
  • 1/4 teaspoon salt
  • 1 cup (two sticks) unsalted butter, softened to room temperature
  • 1 cup granulated sugar
  • 1 egg
  • 1 tablespoon of vanilla extract
  • 2 tablespoon milk
  • Powdered sugar (instead of flour for rolling out the dough)
  1. Mix together flour, baking powder, and salt.
  2. In a separate bowl, place the sugar and butter together. Mix with a stand or a hand mixer until sugar is no longer loose.
  3. Add 1 tablespoon of milk, vanilla and egg. Mix to combine.
  4. Gradually add the flour mixture to the bowl.
  5. Add second tablespoon of milk.
  6. Depending on how warm your butter was, you may either have a very mealy mixture or a relatively smooth mixture.
  7. Use you hands to gather mixture together and kneed gently into two separate disks. Don't over-kneed!!
  8. Place each disk into wax paper and place in the refrigerator for AT LEAST 2 HOURS...You can leave it overnight if you like.
  9. Preheat oven to 375 degrees
  10. Take one disk of dough out of the refrigerator and sprinkle it, your rolling pin, and your rolling surface with powdered sugar.
  11. Roll out dough and cut into desired shapes. Notice how we placed all of our cutters onto the dough first - this way, you can make sure to use your "dough space" to its maximum potential.
  1. Place on a non-stick pan about 1 inch apart and place in the oven for approx. 7-10 minutes.
  2. Repeat steps 10-12 for second disk.
  3. Cool and enjoy, or frost!

Royal Icing:

  • .375 cups of pasteurized egg whites
  • 1 teaspoon vanilla extract
  • 4 cups confectioner's sugar
  1. Place egg whites and vanilla in a bowl and whisk until foamy.
  2. Slowly add the confectioner's sugar at a low speed until mixed.
  3. At a high speed, continue to mix until the frosting peaks (should take 5-7 minutes)

Tuesday, December 22, 2009

A Tail of Two Hats

I am currently a nanny for three amazing and beautiful children - two girls and one boy. The older of the two girls was watching me knit the other day and decided that she wanted to learn how to do it. So, I pulled out my Knifty Knitter hat loom and together, we made a really beautiful green hat.

Obviously, her younger sister wanted a hat after she saw the green hat, so that night, I went home and bought some yarn, picking a light pink and a color changer in shades of cotton candy, ideal for a barbie-lovin'-my-little-pony-lovin' 4-year-old.

On the Knifty Knitter hat loom, you can make a beautiful hat in about an hour. You can pick up a set of these at your local craft store for around $15.00. There are directions included and the hook and needle that you will need for projects.


Hat:
  1. Starting at the peg perpendicular to the others on the side of the loom, loop yarn around the peg to the right of the perpendicular peg and the rest of the pegs by creating a cursive e.
  2. Repeat so that you have two set of loops on each peg
  3. Using the hook tool, pull the bottom of the two rows up and off the peg, so that there is only one set of loops on the pegs.
  4. Continue to loop yarn with cursive e pattern and pull over the bottom of the two rows.
  5. Create brim by folding the first row you created up back onto the pegs - Use the hook tool to pull the bottom of the two rows up and off the peg. A strong rim should be 1 - 1 1/2 inches.
  6. Continue making the hat as before until it is tall enough to fit the future owner.
Pom-Pom:
  • Pom-poms are realllly easy to make! And fun!
  1. Cut a 3 inch piece of yarn.
  2. Wrap yarn from skein 70 times around the four fingers (NOT the thumb).
  3. Cut away from skein.
  4. Carefully pull yarn off the fingers .
  5. Tie the yarn together in the center with the 3 inch piece of yarn - if it needs to be tighter, you can add a second piece.
  6. Use scissors to cuts the loops on either side of the 3 inch piece of yarn.
  7. Even out the pom-pom using scissors
  8. Use a yarn needle to attach to your desired surface.

Monday, December 21, 2009

Straight No Chaser Brings Some "Christmas Cheers"

So, back in the good old days of college, I used to be in an a cappella group. I've always LOOOOVED this totally vocal style of music, and apparently, it's catching on in a major way!

For the holidays, the lovely boys of Straight No Chaser have put together a phenomenal CD featuring amazing and humorous Christmas medleys, while also adding swing, charm, and rich harmonies to those old holiday classics.

Song List:

1. The Christmas Can-Can
2. We Three Kings of Orient Are (Really awesome timing and delivery of words)
3. Christmas Time Is Here
4. Let It Snow
5. Donde Esta Santa Claus
6. Ill Be Home For Christmas (The heart melting harmonies you'd expect from 10 handsome young men)
7. Hey Santa!
8. Rudolph The Red-Nosed Reindeer
9. Youre A Mean One, Mr. Grinch (Features a fierce bass as the soloist! Very cool!)
10.O Holy Night
11.Santa Claus Is Back In Town
12.God Rest Ye Merry Gentlemen
13.Jingle Bells
14.Who Spiked The Eggnog?
15.The 12 Days Of Christmas (This is easily the BEST version of this song ever...mainly because it breaks into the Toto song, Africa...)


Check these guys out! If you need a burst of holiday spirit, the spunk and excitement offered by Straight No Chaser will no doubt make those sugar plums dance in your head!

Sunday, December 20, 2009

Victory's Hop Devil

This week's Brew Of The Week is an old favorite of mine: Victory Brewing Compay's deliciously crisp Hop Devil.
  • My rating: 90
  • Alcohol Content: 6.7 %
This beer is intense and glorious. As you can see, it is an absolutely beautiful beer - rich auburn and copper...For me, this beer is perfect for any time of year (I'm a total hop junky) - In summer, it provides a crisp and refreshing sip on a hot day... and in winter, a swallow is akin to the brisk nip in the air.

A six pack will run you around $8.00 and it is well worth the money! I highly recommend this beer for all y'all other hop junkies out there - it will definitely leave you happy (or maybe hoppy!)

Farrow Ribbed Scarf


I loooove the way this scarf came out! The Farrow Ribbed pattern has a great, lilting flow to it, which made making this scarf very enjoyable. My scarf knit up pretty quickly and is about 6ft long.

To make this scarf, you will need:
  • 2 skeins of Red Heart Sh. Dusk
  • US 8 knitting needles
Skill Level: Beginner

1. Cast on 37 Stitches. (You can cast on more stitches for a wider scarf, but you must cast on in multiples of 3+1).

  • Row 1: K2, P1, K2, P1....K1
  • Row 2: P1, K2, P1, K2, P1...
  • Row 3: K2, P1, K2, P1....K1
  • Row 4: P1, K2, P1, K2, P1...
By having the last stitch of the first row be K and the first stitch of the second row be P, it allows the pattern to look the same on both sides, which is great! If your a beginner looking for a simple but beautiful and rewarding pattern, try the Farrow Rib!

Saturday, December 19, 2009

Chunky Ribbed Scarf


This was my first ribbed scarf! Nothing beats a beautiful ribbed scarf, and this pattern creates a handsome, chunky ribbing that looks very warm and masculine. I made this particular scarf for Christmas as a gift for a friend. It is a relatively narrow scarf, but it is verrrry long and cozy at about 7 1/2 ft.

To make this scarf you will need:
  • 3 Skeins of Lion Brand Jiffy yarn in Dark Grey Heather
  • Size US 10 knitting needles
Skill Level: Beginner

Kasey Taylor, 2009
  1. Cast on 33 stitches. (You can make the scarf wider in multiples of 3 stitches, but will lose length)
  • Row 1: K3, P3, K3, P3...to end of row
  • Row 2: P3, K3, P3, K3...to end of row
2. Continue the scarf by switching back and forth between these two rows. At first, it was a little difficult and annoying to count 3 and 3 and 3 and 3...But once you have 5-10 rows of the pattern, the stitches become very clear and the scarf begins to knit up pretty quickly.

A Knit and Purl "Striped" Scarf


I made this scarf for a family friend. It knit up very quickly and was actually really fun and easy to make. I like the design because it creates a "striped" look without having to switch yarns.

To make this scarf you will need:

* 1 1/2 skeins of off-white Red Heart Soft Yarn.
* US 8 Needles
Level: Beginner

1. Cast on 20 stitches.

2. Because this scarf employs the Stockinette Stitch, you MUST start with a few rows of the garter stitch - The Stockinette Stitch, although beautiful, curls really badly - By putting in several rows of the garter stitch, it creates an anchor that will not curl up. For this scarf, I put in 5 rows of the garter stitch.

3. The Stockinette Stitch not only curls upward, but also inward... So, to prevent this from happening, I made sure that the first three stitches of every row and the last three stitches of every row were all knit, thus creating a lovely little garter stitch border to contain the pattern.
Kasey Taylor, 2009
4.
* First Row: K entire
* Second Row: K3, P until last three stitches, K3

Continue this pattern for 14 rows

5.
* Row 15: K3, P until last three, K3
(Following the original pattern, row 15 should be K all the way across, but by changing it to P, you can create the "stripe.")

6. Continue on to desired length. My scarf was approx. 6ft long.

Saturday, December 12, 2009

A Simple Garter Stitch Scarf

Holy Holiday season, Batman! I am working overtime trying to create intriguing knit fashions for friends and family! The theme is scarves...lots and lots of scarves...I had a brief knitting stint last year, but have really just begun to learn how to work the needles. As a newbie knitter, I'm really trying to do more than just the garter stitch...Nonetheless...

Kasey Taylor, 2009.

This is a scarf that I just knit for my husband in the garter stitch. Although simple, it does create a kind of beautiful undulating pattern.

To make this scarf:

*You will need two skeins of Lion Brand Wool-Ease Chunky in Spice.

* Skill level: Beginner

1. Cast on 20 stitches

2. Choose your axe:
You can either make this scarf by using the knit stitch or the purl stitch - just decide which is easier for you (most likely the knit) and heave-ho until you've reached your desired length!

3. Give to someone you love!

Kasey Taylor, 2009.